CURRENT STATUS OF THE ISO STANDARDIZATION OF ACCURACY DETERMINATION PROCEDURES FOR SURVEYING INSTRUMENTSKarl ZEISKE, SwitzerlandKey words: ISO standards, surveying instruments, test procedures, certificates. 1. INTRODUCTIONThe ISO (International Organization of Standardization) has the goal of creating globally-valid standards that facilitate the international exchange of goods and services and to promote technical cooperation between nations. In this global age, standards are an important source for information gathering on the current state of technology in the various branches and improving communication among specialists around the world. The main task of the ISO committee responsible for geodetic instruments is to provide on-site users with test procedures that are applicable without the need for special ancillary equipment. There is a proven growing requirement for this facility. An increasing number of surveying institutions, governments, universities and engineering companies have an ISO 900x certification. These international standards outline the structure for a quality management system (QMS) that among other things, demand that all measuring instruments are regularly checked resp. recalibrated. It is however beyond the capabilities of many users to carry out adequate inspections of there modern instruments, which for them are a box of mysteries. They search the technical literature for suitable test procedures that can applied without too much effort - and find nothing. The testing procedures outlined in the ISO standards and the recommendations issued by the FIG-commission 5 (WG 5.1) in 1994 on routine checks of EDM instruments are regrettably hardly known, The goals and contents of the relevant ISO standards are described below. 2. TECHNICAL COMMITTEE ISO/ TC172 - OPTICS AND OPTICAL INSTRUMENTSThe terms of reference for ISO/TC 172 is defined as follows: „Standardization of terminology, requirements, interfaces and test methods in the field of optics". The TC 172 consists at present of 7 sub committees:
3. ISO/TC 172/SC 6 - GEODETIC AND SURVEYING INSTRUMENTSThe terms of reference for SC 6 embrace the standardization of terminology, requirements and test methods of geodetic and surveying instruments, their components and accessories. SC 6 is also active in the standardization of quality parameters for instruments and accessories. Member countries, so-called P-members are Germany, India, Japan, the Russian Federation, Sweden, Switzerland and the USA. Regrettably, only specialists from Germany, Japan, Sweden and Switzerland are working in the standards committee at present. 4. EXISTING STANDARDSThe following standards worked out by SC 6 have been published so far: ISO 9849 Vocabulary. This standard defines terms relating to geodetic field instruments, their essential components and various accessories. ISO 12858-1 Ancillary devices for geodetic instruments - Part 1: Invar levelling staffs. For these precision staffs, quality relevant parameters and tolerances have been defined. The most important parameters are the thermal expansion coefficient of the invar strips, the permissible deviation within the graduation and the zero-point error. ISO 12858-2 Ancillary devices for geodetic instruments - Part 2: Tripods. The components connecting the instruments to the tripods are standardized to guarantee compatibility between tripods and instruments made by different manufacturers. Additionally, a minimum requirement in dimensions and stability has been defined. ISO 12857 Field procedures of determining accuracy - Part 1: Levels - Part 2: Theodolites - Part 3: EDM-Instruments. This standard, which is analogous to the longer-established German standard DIN 18723 describes test procedures that enable the empirical standard deviation of a given parameter to be determined and used as a criterion for the measure of precision of an instrument. The purpose of this standard is to make it possible to compare the achievable precision of different instruments or alternatively the precision of one instrument at different times. To enable these comparisons, test procedures were established that largely exclude the influences of external factors such as atmosphere, targeting devices or observers. To test the various instruments the following procedures were chosen: To test levels, two staffs shall be set up approximately 50 m apart. The level shall be placed approximately halfway between the two staffs. After the first readings of the two staffs the instrument shall be picked up and put down again in a slightly different position and the staffs shall be read again. This procedure shall be performed for a total of 40 times. The experimental standard deviation of 1 km of double-run levelling is determined from a least square adjustment of the measurements. For determining the precision of theodolites for horizontal directions five targets shall be set up between 100m and 250m away, and situated at intervals around the horizon as regular as possible. Targets shall be used that can be observed unmistakably, preferably target plates. Four series of observations shall be performed. Each series shall consist of three sets of directions to the five targets in both telescope positions. The result of the least square adjustment of these observations is the experimental standard deviation of a direction observed in both telescope positions. To determine the precision of a vertical angle, a relatively complex procedure is outlined in which graduations on a vertically standing invar staff are used as targets. As even evaluating the results was a disproportionate expenditure of work, a simpler standard was chosen (see ISO/FDIS17123). For EDM instruments, the known procedure of distance measurements in all combinations on a test line without nominal values is used. The test line shall be about 500m long and divided into 6 segments. The experimental standard deviation of a single distance is determined from a least square adjustment of the distances in all combinations. For the interpretation of the results, each part of the standard contains statistical tests in order to answer the following questions:
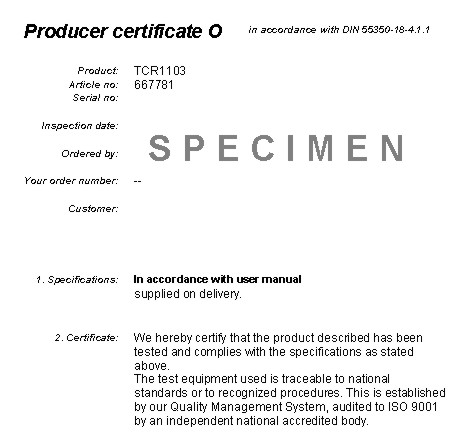
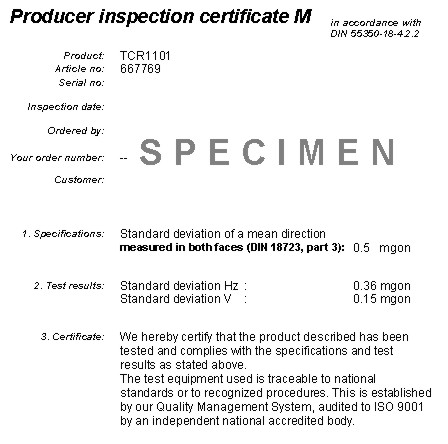
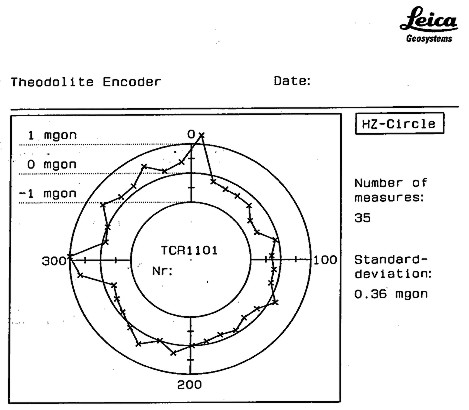
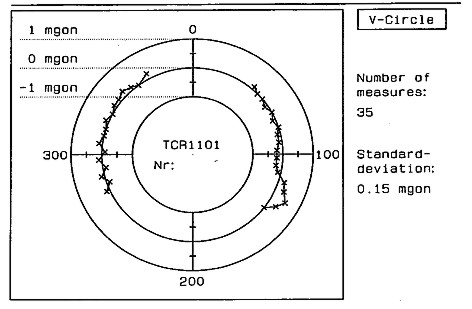
For those tests a confidence level of 1-a = 0.95 is assumed. Parallel to the standards indicated in TC 172/SC 6, standards from ISO/TC 59/SC 4 "Building construction - Limits and fits in building construction" were also compiled; they include suggested test procedures for instruments used to carry out measurements on construction sites. ISO 8322 Building construction - Measuring instruments - Procedures for determining accuracy in use - Part 1: Theory - Part 2: Measuring tapes - Part 3: Optical levelling instruments - Part 4: Theodolites - Part 5: Optical plumbing instruments - Part 6: Laser instruments - Part 7: Instruments when used for setting out - Part 8: EDM-instruments. These standards outline test procedures for a particular instrument with its accessories to determine if it can achieve the specified accuracy and if it is suited for a given measuring task. These tests should be performed in the same environment as the specific measuring tasks. Although the goal here is different from that expressed in the test standards of TC 172/SC6, the test procedures proposed are in some respects similar. However, by virtue of their complexity, non of the test procedures suggested to date are suitable for the periodical routine inspection of survey equipment on a construction site. That means, ISO 8322 standards are practically not used as confirmed by many surveyors and civil engineers. Thus, the testing procedures of ISO 8322 shall not be outlined. In order to improve the situation and not work on parallel tracks, a joint working group (JWG) was formed to rework ISO 12857 and ISO 8322 and to create a single standard. After reaching agreement with the standard committees TC 172/SC 6 and TC 59/SC 4, JWG was integrated into TC 172/SC 6. Meaning that in future for test procedures for surveying instruments only TC 172/SC 6 is responsible. 5. CURRENT TASKS OF ISO TC 172/SC 6The standards currently being worked on by TC 172/SC 6 are in DIS (Draft International Standard) or FDIS (Final Draft International Standard) status. The main work is concentrated on the new ISO 17123: Field procedures for testing geodetic and surveying instruments. ISO DIS 17123 - Part 1: Theory. This part gives the formulae used in the specification of the test procedures to be adopted for the determination and assessment of the achievable measure of precision of geodetic and surveying instruments. ISO FDIS 17123 - Part 2: Levels - Part 3: Theodolites - Part 4: EDM-instruments. These three standards describe the new test procedures worked out by the JWG. In a first part, a simplified procedure is described which is normally intended for checking whether the error of a given equipment in conjunction with its operator is within a specified maximum permissible error or if the measure of precision of the instrument has changed since the last test. This simplified procedure is based on a limited number of observations and thus a calculated experimental standard deviation can only be an indication of its actual size. In a second part, the full test procedures described in ISO 12857 to determine the best achievable measure of precision of a particular instrument and its ancillary equipment were taken over. The simplified procedure for levels relies on having a height difference between two points, approx. 60m apart, which is accepted as a true value. The difference between the measured height difference over unequal sight lengths and the value accepted as true between the same two measurement points obtained from equal sight lengths indicates whether the level meets a specified permissible error for the intended measuring task. If the difference is too large, this indicates an excessive uncertainty of the measurement across the long distance, resulting from reading error, refraction and displacement of the collimation axis. Like the comprehensive test procedure for theodolites, the simplified test procedure is based on sets of angles, but only three sets are measured to four targets, and that only once. In order to check the measure of precision of the vertical angle, it is proposed for both the comprehensive and the simplified test procedures that four prominent targets on a high-rise building, covering a vertical range of about 30°, be measured several times in both faces. The expenditure of effort for the simplified test procedure is to be kept very low. The simplified test procedure for EDM instrument relies on having a test field with some distances which are accepted as true values. It should be typical distances for the usual working range of the particular EDM instrument. These unknown distances have to be determined either with an instrument of higher accuracy or with the instrument to be tested immediately after having it calibrated according to the full test procedure. To check an EDM instrument it is enough to measure these distances periodically. Only when there are too large deviations for the intended task it is necessary to make further investigations in order to identify the main sources of the errors. ISO DIS 17123 - Part 5: Total stations - Part 6: Rotating lasers. These two parts are still in draft form. As in parts 2 to 4, two testing procedures each are described which are still under discussion. A further task of TC 172/SC 6 is a revision of the mentioned ISO 8322 standards. 6. INSTRUMENT TESTING AND CERTIFICATION AT LEICA GEOSYSTEMSLike most manufacturers of surveying instruments, Leica Geosystems also specifies the experimental standard deviation as a measure of precision according to DIN 18723 or ISO 12857 in brochures and user manuals. Not every instrument is subjected to such a test procedure. For instruments in the later production series it is enough to carry out periodic spot tests to confirm the information provided by the final factory inspection. More and more contractors of large survey projects demand that the responsible surveyor provide a manufacturer issued certificate confirming the accuracy of the instrument to be used. This is particularly demanded of EDM instruments and Total Stations. In this case, the customer may obtain two different certificates from Leica Geosystems (see appendix). The producer certificate O which certifies that the instrument in question has been tested and meets the specifications in accordance with the user manual or the producer certificate M which provides the actual experimental standard deviation after being put through the relevant test procedures. Only distance measuring instruments are tested according to the procedure of distance measurements in all combinations. The angle-measuring accuracy of a theodolite is determined on the theodolite-testing machine (TPM), (INGENSAND, 1990). The results obtained there have been confirmed several times by field measurements in accordance with the test procedure for the standard. 7. CONCLUSIONThe demand for suitable testing procedures for geodetic instruments is on the rise. The reasons are increasing demands on safety and accuracy of geodetic measurements and the contractor's need for certificates confirming the accuracy of the instruments to be used. It is therefore necessary to create uniform, universally-recognized standards for test procedures that can be applied in the field without excessive effort. In this connection, it is important that specialists from as many countries as possible participate in the standardization work of ISO TC 172/SC6 and that the standards for test procedures, as outlined here, are applied widely. REFERENCESDIN 18723, (1990): Feldverfahren zur Genauigkeitsuntersuchung geodätischer Instrumente. (Field procedures for precision testing of surveying instruments) FIG WG 5.1, (1994): Recommended Procedures for Routine Checks of Electro-Optical Distance Meters (EDM), FIG Technical Monograph No. 9 GOTTWALD, R., RÜEGER, J.M., (2000): Feldprüfverfahren für elektronische Tachymeter - Wunsch oder Realität ?, AVN 11-12 INGENSAND, H., (1990): A new method of theodolite calibration, FIG 19. International congress, Helsinki, page 502.2/1 ISO 8322, (1992): Building construction - Measuring instruments - Procedures for determining accuracy in use - Part 1 - 8 ISO 9849, (2000): Optics and optical instruments - Geodetic and surveying instruments - Vocabulary ISO 12857, (1997): Optics and optical instruments - Field procedures for determining accuracy - Part 2 - 4 ISO 12858, (1999): Optics and optical instruments - Ancillary devices for geodetic instruments - Part 1 - 2 ISO/DIS 17123, (2000): Optics and optical instruments - Field procedures for testing geodetic and surveying instruments - Part 1 - 6 SPATA, M., (2000): Zum Thema "DIN, CEN und ISO", AVN 11-12 APPENDIXThe next pages show the producer certificates O and M from Leica Geosystems and an example of the angle-measuring accuracy of a total station obtained from measurements on the TPM. Form and content of the certificates are essentially defined, e.g. in the German standard DIN 55350.
BIOGRAPHICAL NOTESKarl Zeiske was born in 1936 in Berlin, Germany. He got a degree in Geodesy (Dipl.-Ing.) from the Technical University in Berlin. In 1967 he joined Leica Geosystems, the former Wild Heerbrugg. After various positions in development and marketing he was appointed to the position of a product manager for total stations in 1984. He retired at his own request in 1999 to consultant status. He had published several papers about EDM-instruments, total stations and test procedures. He has been an expert in the standard committee ISO TC 172/SC 6 "Optics and optical instruments - Geodetic and surveying instruments" for more than 15 years now. Since 1994 he has been chairman of this committee. CONTACTDipl.-Ing. Karl Zeiske 30 April 2001 This page is maintained by the FIG Office. Last revised on 15-03-16. |
