|
||||||||||||||||||||||||||||||||||||||||||||||||||||||||||||||||||
|
DIN 18710 "Engineering Surveys" |
||||
|
Part 2: |
Part 3: |
Part 4: |
||
Fig. 1: Design of DIN 18710 "Engineering Surveys"
The new standard DIN 18710 "Engineering Surveys" consists of four parts. Part 1 is called "General Requirements" and can be seen as the underlying basis of the other three parts, which are dealing with detail or topographic surveys (part 2), setting out (part 3) and deformation measurements (part 4). The design of DIN 18710 is given in fig. 1.
In addition to DIN 18710 there are some other standards specifically related to surveying respectively geodesy. E.g. in DIN 18709 "Terms, Abbreviations and Symbols", esp. part 1 "Generalities", part 2 with the subtitle "Engineering Surveys" and part 4 "Adjustment and Statistics", terms and definitions as used in Surveying and Mapping are collected and in DIN 18723 "Field Procedures for Accuracy Tests of Survey Instruments" some guidelines for the examination of instruments like theodolites and EDM’s are emphasised. More details about the actual activities in this field of standardisation, the organisation of DIN with respect to Surveying and Mapping and the international implications can be found in Knoop (1997), a more historical review on the appropriate standardisation – the activities in Germany commenced already in 1927 – is given by Ahrens (1978) for instance.
The main contents of DIN 18710 part 1 to 4 shall be discussed very briefly in the following. It is to mention that any standard in Germany only contains technical aspects and neither the conclusion of contracts with their legal status aspects nor any recommendations about the remuneration of the performance is touched2. All given statements in standards are requirements resp. recommendations on a very general level. They are not obligatory in the sense that deviating, for particular applications apparently more suitable agreements are always possible. Then the partners involved – customer and contractor – have to agree upon them. In cases of doubts usually the respective standards are cited, e.g. in judgements. Before creating DIN 18710 there were no sufficient official general documents establishing technical requirements about Engineering Surveys in Germany. Therefore the necessity of this standard seemed to be given from the point of Engineering Surveys and also from the point of Civil- and Construction Engineering. An incorporation of the undermentioned contents to other already existing standards seemed not to be suitable (Klein, 1999).
2 There are other documents in Germany dealing with these topics in particular, e.g. the VOB (guidelines for the submission and letting) and the HOAI (guidelines for the honorarium calculation, esp. part XIII: Surveying Performances). Commonly they are not sufficient for technical aspects and the definition of requirements in Engineering Surveys.
2.1 General Requirements
The main intention of the new standard DIN 18710 is to conclude by the preface of part 1 (1999): "This standard defines general principles concerning surveys for buildings, their elements (e.g. industrial plants, traffic plants, machinery plants) and other objects. The requirements and proofs of this standard shall contribute to set up agreements about surveys. This standard shall also contribute to the regularisation of quality and records of Engineering Surveys and shall ensure that results can be interpreted unambiguous."
The essential content of part 1 "General Requirements" is the summary of the most important terms and definitions (section 3), like e.g. establishment of an external and an internal reference frame for Engineering Surveys, and the enumeration of global requirements about Engineering Surveys (section 4). The given terms and definitions and the requirements have to be seen in close connection with the so-called annex A of this standard about the fundamental definitions of measurement techniques in Engineering Surveys. In this annex the meanings and interrelations between terms like measurand, measured value and complete result of measurement etc. are explained. The separation between qualitative terms of accuracy like accuracy, precision and correctness and quantitative terms of accuracy like uncertainty of measurement and standard deviation is performed in detail together with some terms of reliability and their minimum values to preserve.
The given requirements are dealing with the organisation of a survey, the personnel, the instruments and techniques to apply, the accuracy aspects, the evaluation and the documentation in particular, they are covering all aspects of a specific survey. Most of these given requirements are obvious and, however, partly more or less elementary. For instance if a description of the survey to perform is demanded or if the naming of responsible persons for the survey is requested to ensure an impeccable organisation.
To establish a uniform framework on the accuracy aspects in Engineering Surveys two tables can be found, see tab. 1 and 2 (L indicates "Lagevermessung"). In tab. 1 for horizontal surveys and tab. 2 for vertical surveys the mean values are given by the classes L3 and H3. They are to define a mean situation to achieve under normal conditions by Engineering Surveys. There are some comments to explain these tables. For instance it is stated that the accuracy of co-ordinates is depending on the quality of the reference frame and that influences of the object, e.g. vibrations, have to be regarded. Often all accuracy requirements have to be seen with respect to neighbouring points only. The classification performed can/shall be used e.g. to calculate the necessary sacrifice of time and for the election of suitable instrumentation- and measuring techniques in a specific survey.
Tab. 1: Classification of Measurement Accuracies for Horizontal Surveys (DIN 18710-1)
|
Class |
Standard Deviation s L for Horizontal Surveys |
Remark |
|
L 1 |
50 mm < s L |
Very low Accuracy |
|
L 2 |
15 mm < s L £ 50 mm |
Low Accuracy |
|
L 3 |
5 mm < s L £ 15 mm |
Mean Accuracy |
|
L 4 |
0.5 mm < s L £ 5 mm |
High Accuracy |
|
L 5 |
|
Very high Accuracy |
Tab. 2: Classification of Measurement Accuracies for Height Surveys (DIN 18710-1)
|
Class |
Standard Deviation s H for Height Surveys |
Remark |
|
H 1 |
20 mm < s H |
Very low Accuracy |
|
H 2 |
5 mm < s H £ 20 mm |
Low Accuracy |
|
H 3 |
2 mm < s H £ 5 mm |
Mean Accuracy |
|
H 4 |
0.5 mm < s H £ 2 mm |
High Accuracy |
|
H 5 |
|
Very high Accuracy |
The requirements about the accuracy of Engineering Surveys, e.g. based on tab. 1 or 2, can be made with respect to the tolerances in Civil- and Machinery Engineering or due to other specific agreements between the partners involved. A review on the most important terms of sizes and tolerances is given by the annex B of DIN 18710-1, a graphical presentation of some terms here in fig. 2. Of practical importance is the achievement of a well-balanced relationship between the pretenced tolerances and the accuracy of a survey. Such relationships are to be set-up for particular normal sizes with respect to their actual measures under well-defined conditions, e.g. a specific reference temperature (a "reference state"), individually.
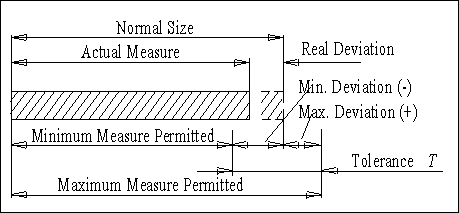
Fig. 2: Graphical Presentation of Sizes and Measures
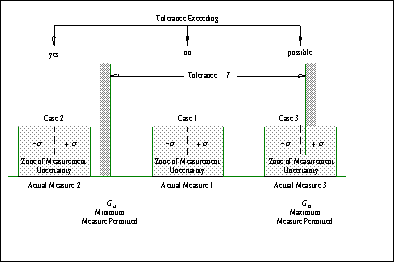
Fig. 3: Tolerance, Measurement Uncertainty and Tolerance Exceeding
Here the DIN 18710 recommends to obtain a ratio V of
|
(1) |
To give an example: In road surveying the tolerance may be pretenced with T = 5.0 cm (+/- 2.5 cm min./max. deviation, compare fig. 2). Based on (1) the standard deviation as the ordinary size of the measurement uncertainty to be kept must be better than s x =1.0 cm. A standard deviation is defined as a positive quantity, the zone of measurement uncertainty at a probability level of 68% by +/- s x. The situation with a ratio of V= 20% is presented in fig. 3. By defining this ratio V a clear rejection criterion is given in the proof of tolerances and in setting outs the survey claims a small part of the total tolerance T only. Critical and if possible avoidable is the case 3, where no well-defined decision can be made.
In DIN 18710-1 it is furthermore stated: "The measuring techniques are to perform in that way, that the accuracy and reliability of the survey according to the requirements will be ensured and that the aims of the surveys will not be affected by systematic errors". Accuracy aspects are already discussed above. To fulfil the reliability criteria of a survey very often a doubled occupation of a survey point is carried out. For such a situation the accuracy of the result will increase by (uncorrelated and uniform observations presumed)
|
(2) |
and the respective redundancy factor as the main reliability criterion is obtained by
|
(3) |
|
|
|
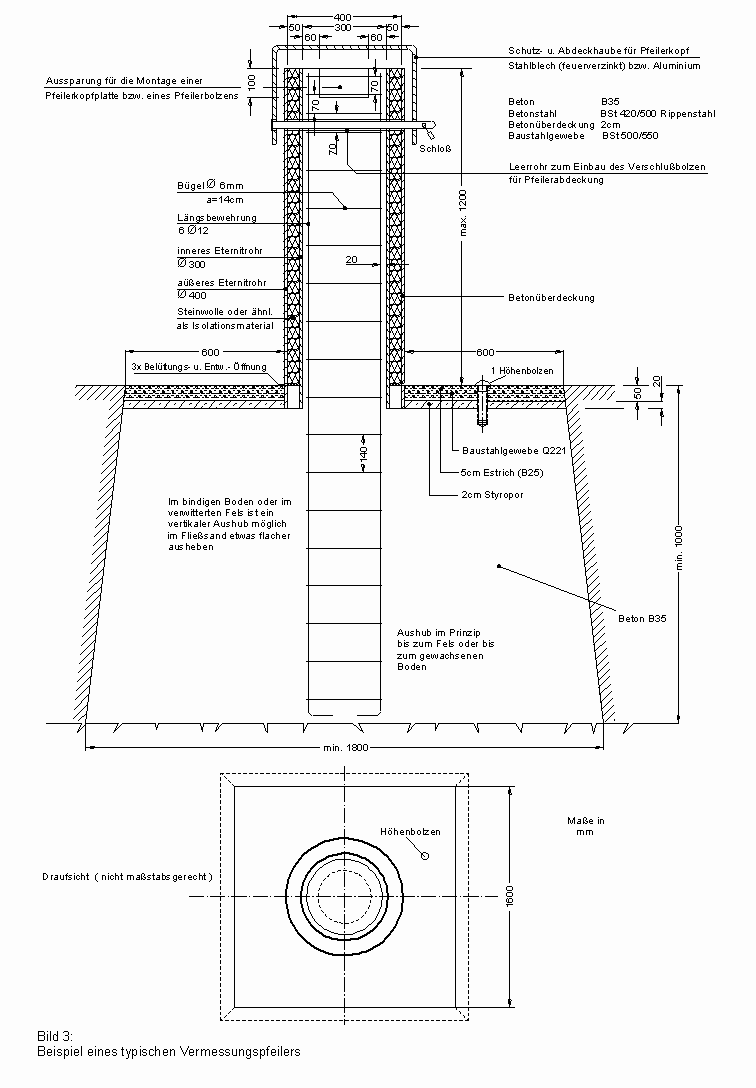
| Fig. 4: Example of an observation pillar, see DIN 18710-1, Annex C |
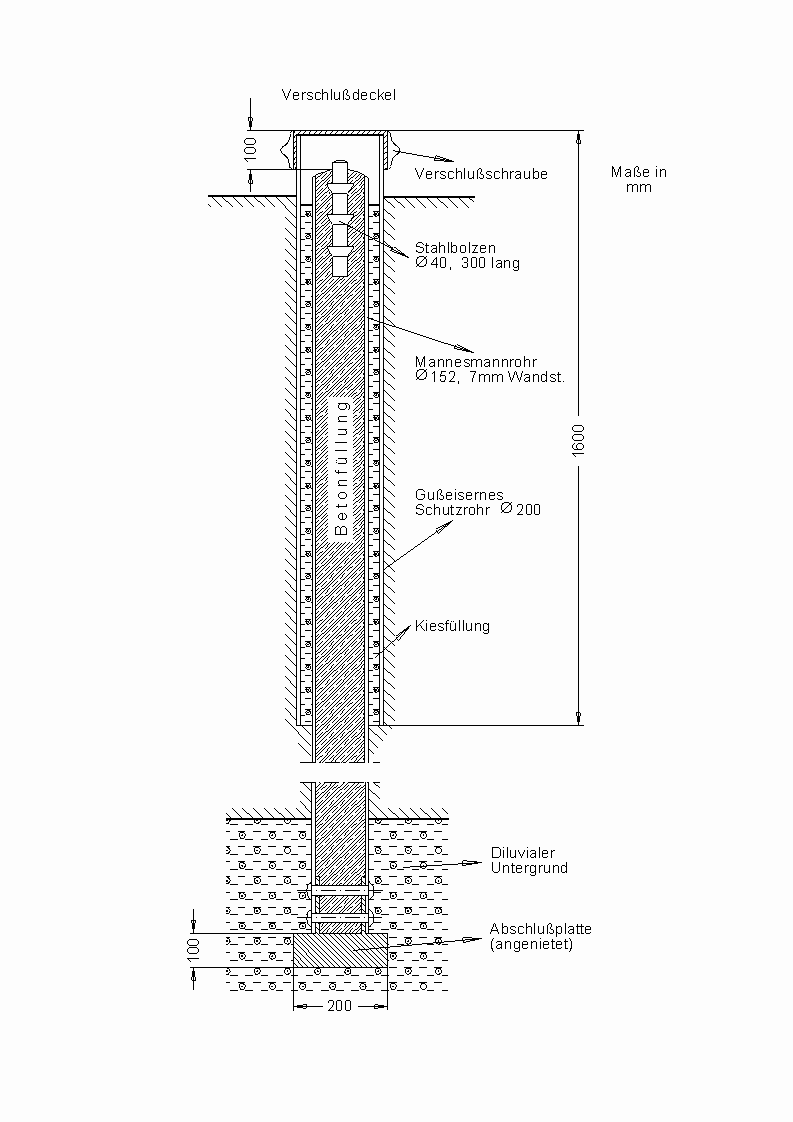
Fig.: 5: Example of a benchmark, see DIN 18710-1, Annex C |
This is admissible according to DIN 18710-1, where r
> 0.3 is recommended. Both, a measured value x together with a
respective standard deviation ![]() completes the result of a survey. Generally the primary result of a survey
is given by a vector x (resp.
completes the result of a survey. Generally the primary result of a survey
is given by a vector x (resp. ![]() )
with a corresponding covariance-matrix
)
with a corresponding covariance-matrix ![]() .
.
Last but not least the construction of survey points is of practical importance in all kinds of Engineering Surveys however. Often the efforts (the costs) in the establishment of stable points, e.g. a stable reference frame during the surveillance of an object, are underestimated, esp. by the customers of such surveys. There are some hints on this subject in DIN 18710-1 and the annex C gives some examples for the construction of survey points, see fig. 4 and 5.
The final annex D of DIN 18710-1 shows how the given requirements of the section 4 can be correlated with the requirements in quality management documents. The DIN 18710 is not made to create or to replace a quality management system of the user, only possible assignments are performed.
2.2 Detail Surveys
A detail (or topographic) survey deals with the recording of geometrical quantities of the states of objects and their documentation, for instance in a GIS (e.g. Building Information System, Network or Utility Lines Information System). DIN 18710-2 (2000) lists some typical examples of objects to record for different purposes with their accuracy requirements usually to achieve. A check measurement is defined as a specific detail survey for the acceptance of a building or a plant. The importance of the data organisation is emphasised and some hints for the documentation are given. All given requirements are made with respect to the content of DIN 18710-1. Several typical examples for plans (topographic survey for road planning, works area plan etc. ) are collected in the annex.
2.3 Setting Out
Setting out is the realisation of geometric quantities in the field based on a planning. According to DIN 18710-3 (2000) it is to separate between the setting out documents - it has to be regarded that these documents are complete and unambiguous – and the setting out data for the points to mark at the site. The required accuracy is to agree upon the pretenced tolerances in general, see DIN 18710-1. Some typical examples for setting out objects and their important points to stake out are listed. It is said that the points staked out on the basis of a uniform reference frame must be controlled and the accuracy achieved has to be recorded.
2.4 Deformation Measurements
The determination of movements and distortions of an object is the subject of deformation measurements (see DIN 18710-4, 2000), which includes all necessary efforts of planning, execution and evaluation of such kind of surveys. DIN 18710-4 mentions that the result of a deformation survey is the quantification of the geometric behaviour of an object with respect to time but the task can be seen in the explanation of the changing geometric behaviour as a result of causative factors too. The evaluation has to distinguish between the measurement uncertainties and the significant movements and distortions of the monitored object, usually this is made by statistic tests.
In DIN 18710-4 it is furthermore outlined that the ordinary approach consists of a network with a reference frame and object points to describe the geometric behaviour of the object, see fig. 6. Besides the definition of points and kinds of measurements (relative/absolute) some terms of rigid body movements and distortions are given. Additionally some basic requirements about the survey points, the survey instruments and techniques and the necessary accuracy of the measurements are laid out.
Of special interest in this standard is the so-called Monitoring Program ("Messprogramm"). In this program to be developed by the partners the aims and intentions of the surveying shout be explained and which techniques are to apply. Whilst executing the monitoring any departures from the turn controls have to be documented.
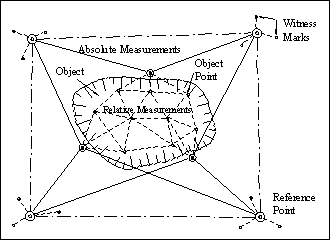
Fig. 6: Surveying points and their connection to a monitoring network, see DIN 18710-4
There are four informative annexes in DIN 18710-4 dealing with principle types of object reactions for the planning of a survey (A), deformation models and their classification for the evaluation (B), examples for graphical representation of results for the presentation and documentation (C) and some selected hints to references (D).
3. INTENTIONS AND BENEFITS OF DIN 18710 ENGINEERING SURVEYS
Regarding the standardisation activities in Germany some fundamentals are to be stated:
- In a standard only very general requirements and recommendations can be made, e.g. no specific techniques or instruments can be recommended for particular applications. There are no recommendations how to execute a specific survey. Here everybody proceeds on his own responsibility, the given general requirements are to be regarded and to be kept (so far there are no other respective agreements),
- The developments of new measuring- and evaluation (presentation) techniques, esp. the application of new instruments, shall not be restricted, therefore no details are given on these subjects in DIN 18710. The choose of suitable instruments and techniques is devoted to the user of the standard,
- A new standard with its statements must coincidence with the other already existing standards dealing with similar or comparative themes like standards from statistics or quality control, disagreements between standards are to exclude,
- A new standard has to use proper defined terms with respect to the interdisciplinary impact of the standardisation but also with regard to the profession itself to improve the communication between all partners involved,
- A standard is no compendium (each of the four parts of DIN 18710 is about 20-25 pages long), some at least basically branch knowledge of the user is presupposed. But due to the interdisciplinary character of the standard also some explanations and comments for those how are not concerned with Engineering Surveys in particular are to be made.
Any standardisation efforts in the field of Engineering Surveys are difficult due to the wide spectrum of appropriate surveys and the rapid developments of the profession. The "product" and its quality to be established by Engineering Surveys is hard to define in a general way. This is superposed by the various and sometimes divergent intentions of the potential users of such a standard. Those how are competent in contract letting like to see more detailed instructions, others not too many specific regulations. Finally the result obtained with DIN 18710 is a compromise. It is to accentuate that DIN 18710 is not made for a specific application and has to cover the whole above mentioned spectrum of surveys. Based on the standard further documents (instructions sheets, regulations) are to be elaborated for special applications by the relevant organisations, e.g. for road surveying or bridge monitoring.
One of the main intentions of DIN 18710 is to achieve a better communication between the partners involved in Engineering Surveys. The standard shall develop to the general accepted technical bases of such surveys. The standard shall create a legal protection and a mutual confidence of the partners, it shall be made use of this standard in respective contracts. By defining the above mentioned requirements the contract letting will be made easier, the execution of a survey is well-structured and some rules for the evaluation and documentation are given. Thus the efficiency and economic of Engineering Surveys will be improved (compare Höper/Klein, 1998).
4. GEOMETRIC QUALITY – ONE ASPECT IN CONSTRUCTION ENGINEERING
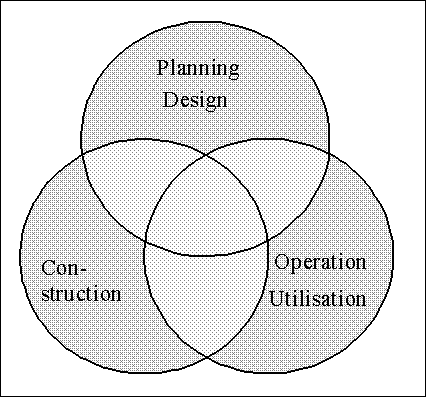
Regarding the definition of Engineering Surveys in DIN 18710-1, the profession is involved in all phases during the lifetime of a building, see fig. 7, beginning at the stage of planning and design during the construction up to the monitoring at the operation respectively utilisation phase. Facing the fact that resources are getting narrow in an ageing infrastructure, the circuit can be completed by demolition and – whereby e.g. the utility service networks are still existing – new planning. In all these phases the geometric quality is of high importance. Deficiencies in the static behaviour, the operation of construction elements or the building as a whole and – last but not least – in the aesthetic of the construction are very often consequences of shortcomings in the geometric quality.
|
|
Fig. 7: Interaction between different phases during the lifetime of a building (see Laermann 1994) |
Geometric quality is a property of buildings and other constructions as a whole, especially of complex constructions. Requirements about the geometric quality are usually defined by tolerances and can be controlled to ensure the adherence of the quality claims by Engineering Surveys. There are statistics that about 90% of the quality requirements are of geometric nature, thus quality assurance can be done mainly by determination and evaluation of geometric quantities. During the lifetime of a building according to fig. 7 (or an other construction), esp. during the time of planning and construction, often the different respective (part-)performances in Engineering Surveys are requested by different customers (each customer for particular quantities) and sometimes established by different conductors (at the several stages of planning and construction). Often the practised so-called "moving planning" leads to defects and damages and – in the end – additional costs. Engineering Surveys should establish as a fixed component in all mentioned phases of fig. 7. In this scope Engineering Surveys should play a much more central role, should take over a more co-ordinating function and should not be regarded as a simple service in future (Klein, 1996, Klein/Wolff, 1996 and 1997, Wolff, 1999). Persuasion work is still to be done.
Engineering Surveys can contribute in producing "quality" mainly by the following subjects:
- Determination of (geometric) quality requirements and testing procedures,
- Surveillance of keeping the geometric quality requirements,
- Documentation of the several phases resp. states of a building or a construction.
Especially in the geodetic monitoring of structures there is an enormous potential to avoid damaged and to prolong the operation time of constructions (more details see e.g. Laermann, 1994).
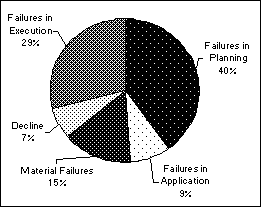
Nowadays "quality" is the decisive economic factor in building industry but, however, sometimes hard to define and to assess in an objective manner. Looking at the total sum of failures in building industry in Germany there is an amount of more than 20 milliards DM per year. This is about 4% of the investigation amount. The failure reasons can be separated like to be seen in fig. 8, they are mainly caused by
- Defects in planning,
- Offences against acknowledged technical rules,
- Deviations from the construction plans during execution.
|
Fig.8: Failure Reasons of Buildings in Germany (see Klein 1996) |
About 5% of the sum is commonly regarded as avoidable. The total amount of building investigations in Europe is about 1.230 milliards DM per year, about 40% of this volume is allotted to German companies. To ensure the "quality" of products the meaning of quality assurance and respective standards will increase. The reduction of failure costs (5% = 61.5 milliards DM) will justify additional expenditures. Engineering Surveys have to give their contribution even if the immediate resulting effects will be not seen as a direct benefit of Engineering Surveys (Klein, 1996). However, a respective standard – DIN 18710 "Engineering Surveys" – is necessary and important to refer to.
5. OUTLOOK
In the field of standardisation respective Engineering Surveys the following two urgent steps are remaining for the near future:
- It is to observe how the new DIN 18710 will prove in practice and to see where are still some insufficiencies and deficiencies. Then the standard can be improved in a revision in the next years depending on these experiences. Further guidelines resp. instruction sheets for particular applications referring to DIN 18710 are still to develop.
- Due to the globalisation and internationality in building industry and Engineering Surveys, which is expected to increase in the future by a growing European market, activities towards an European standardisation in the field of Engineering Surveys are to think about and, however, to recommend.
In building industry there are already the so-called eurocodes at a level of European pre-standards, for instance the EC 7 "Geotechnical Design", part 1 "General Rules" (EVN 1997, 1994). In this eurocode the so-called observation method is emphasised thorough to control the behaviour of constructions under loads and to improve the respective computation models. There is a strong relationship between this and the deformation measurements according to DIN 18710-4 (2000). In other sections of EC 7 the geometric quality of constructions is concerned or at least mentioned in an implicit way. Here again interrelations to the tasks of Engineering Surveys are obvious.
References
Ahrens, H. (1978): 50 Jahre Normung für das deutsche Vermessungswesen. ZfV, Sonderheft 20
DIN 18710-1 (1999): Ingenieurvermessung, Allgemeine Anforderungen
DIN 18710-2 (2000): Ingenieurvermessung, Aufnahme
DIN 18710-3 (2000): Ingenieurvermessung, Absteckung
DIN 18710-4 (2000): Ingenieurvermessung, Überwachung
ENV 1997-1 (1994): Eurocode 7 Geotechnical Design – Part 1: General Rules
Höper, D., Klein, K.-H. (1998): Engineering Survey according to DIN – A Contribution to International Standardisation. XXI FIG Congress, Com. 6, Brighton, pp. 375 – 381
Heunecke, O. (1999): Die Genauigkeit und Zuverlässigkeit von Ingenieurvermessungen nach E DIN 18710 Teil 1. DVW Schriftenreihe 36 „Ingenieurvermessung im Bauwesen", Stuttgart, pp. 106 – 130
Klein, K.-H. (1996): Beitrag der Ingenieurvermessung zur Qualiätssicherung beim industriellen Bauen. Bauingenieur 71, pp. 315 - 320
Klein, K.-H., Wolff, D. (1996): Der Beitrag der Ingenieurvermessung zum Qualitätsmanagement im Bauwesen. In: Brandstätter/Brunner/Schelling (eds.): Ingenieurvermessung 96, Vol. 2, C4, Graz
Klein, K.-H., Wolff, D. (1997): Zur Ausgestaltung von Qualitätsmanagement im Bauwesen durch ingenieurgeodätisches Expertenwissen. AVN 105, Vol. 8/9, pp. 161-166
Klein, K.-H. (1999): Notwendigkeit, Aufbau und Inhalt der E DIN 18710 Teil 1 (Grundsätze). DVW Schriftenreihe 36 „Ingenieurvermessung im Bauwesen", Stuttgart, pp. 37 – 50
Knoop, H. (1997): Aktuelle Entwicklungen der Normung im Bereich Vermessungswesen/Geoinformation. DVW Schriftenreihe 27 „81. Deutscher Geodätentag 1997 in Karlsruhe", Stuttgart, pp. 167 - 176
Laermann, K.-H. (1994): Über die Sicherheitsbeurteilung von Baukonstruktionen mit Methoden der experimentellen Mechanik. Bautechnik 71, Vol. 1, pp. 2 - 7
Wolff, D. (1999): Qualiätswirksame Potentiale der Ingenieurvermessung im Bauwesen. DVW Schriftenreihe 36 „Ingenieurvermessung im Bauwesen", Stuttgart, pp. 24-36
BIOGRAPHICAL NOTES
Karl-Hans Klein, born 1941 in Freudenthal, is Professor for Geodesy/Engineering Surveys at the Bergische Universität – Gesamthochschule Wuppertal since 1992. Since 1993 he is the chairman of the commission "geodesy" at the DIN standardisation committee "Bauwesen" (building industry). His main activities are concentrated on the impact of quality management in Engineering Surveys and the quality control in building industry.
Otto Heunecke, born 1960 in Hildesheim, is assistant at the Geodetic Institute, University of Hannover since 1989. He is working in the commission "geodesy" of DIN since 1996 and was from 1996 to 1999 a member of the Ad-Hoc Committee "Terminology and Classification" of FIG Working Group 6.1. His main interests are dealing with deformation measurements and their evaluation in an interdisciplinary context.
Prof. Dr.-Ing. Karl-Hans Klein
Department of Surveying
University of Wuppertal
E-mail: [email protected]
Dr.-Ing. Otto Heunecke
Geodetic Institute
University of Hannover
E-mail: [email protected]
27 March 2000
